-

Friday, January 31, 2014

Kitchenware Basics You Should Own...

 Basic Kitchen Essentials:
(This is a basic suggestion list)
Who could use this List??? Well....just about everyone!
Newly Engaged couples could use this list to compile their gift/wedding registry. It's also great idea for college students & singles. Or.... just use to  replace missing items from your kitchen gallery. I take inventory about every 6 months to replace broken or needed items.

Basic Set of dishes, service for 6-8 minimum, (up to 12)
set should include: Dinner plate, bowl &/or salad plate,
Coffee cup with or without saucers

Serving Bowls/Dishes in several sizes
Casserole Dishes with Lids, several sizes
(*Colors should blend nicely with your dishes)
Pitchers for Drinks
Gravy Boats, 1 or 2
Sugar and Creamer containers
Salt and Pepper shakers or mills

Silverware, service for 6, 8 or 12
Serving utensils, to match
such as spoons, forks, serving spatulas

Drinking Glasses 6-12, in two sizes

Wine Glasses, 12-24 
(*You may choose to use different sizes, white & red wine glasses) 

Various cocktail & beer glasses to suit your needs

Baking and Roasting pans:
12-15" open roasting pan 
9x13 baking pan, 1 or more; metal, glass, stoneware
5x9 bread pan, 2 in metal, glass or stoneware
2 - 8 or 9" round layer cake pans
2 - 8 or 9" square layer cake pans
1- 8 or 9" round cake pan
1 - 8 or 9" square cake pan
1 - 9 or 10" tube pan
Bundt Style pan, 1 02 more
Cookie sheets, 2 or more
8-10" Pie Plates, 2 or more
Muffin/Cupcake Pan, 1 or 2
Springform pan, 1 or 2
2 - Pizza Pans
Pots & Pans:
1, 2 and 3 quart pans with lids
2 or 3 quart with steamer basket and lid
(*Boiler insert would be great too!)
1 or more, 7-9" fry pan, lid 
1 or more, 10-12" fry pan, lid
6 quart dutch oven
Stock pots, heavy gauge with lids, 2 sizes
Appliances:
Coffee Maker
Mixer, Stand and/or Hand
Toaster
Toaster Oven
Crock Pot
Tea Kettle
Electric Skillet/griddle
Waffle Machine
Blender
Food processor/chopper
 Grill Press
Cooking and Kitchen Essentials
Heat resistant Spoons and Rubber Spatulas in various sizes
(*at least 2 of each)
Large Slotted spoon
Large Solid spoon
Cooking Spatulas, solid and slotted
Pizza Cutter
Pie Server
Desert Server 
Can and Bottle openers
Ice Pick
Wine openers
Corks for bottles
Cooking Bands
Gravy & Soup Ladles, various sizes
Vegetable peeler
Set of Knives, various sizes 
Steak Knife set
Funnels, various sizes
(narrow and wide mouth)
Measuring Spoons & Cups
Liquid & Dry measuring pitchers
Thermometers; cooking, meat, candy 
Graters of several sizes; 4 sided & flat
Tongs; for cooking and serving
Baking Timer
Shelf Liner: for cupboards, drawers...
Drink containers: 2 or more, various sizes
Long Handled Cooking Forks
Large and Small Strainers
Long Handle Strainer (spoon/dipper style)
Rolling pin
Pastry Blender
Pastry Brush
Cake/Cookie Racks (for cooling)
Potato Masher
Kitchen Shears
Knife Sharpener, Steel or Stone
Cutting Boards, various sizes
Whisks/Whips, various sizes & styles
Various sizes of containers/lids or jars/lids
Trivets for Hot Dishes, several
Pot Holders & Oven Mitts
1 dozen dish clothes
1 dozen dish towels
Dish Strainer: for hand washed items, traditional or cloth pad

Stylish and Prepared...

Continue Reading ...

Monday, January 27, 2014

Bacon Wrapped Chicken Alfredo

  • An Easy & Quick Chicken Dinner...

Bacon Wrapped Chicken Alfredo

Preheat oven at 350 degrees

  • 6-8 Chicken Thighs
  • 6-8 Strips of bacon, partially cooked, wrap around the thighs
  • 1 jar of Alfredo Sauce, pour over wrapped chicken
  • Seasoning: Garlic pepper, dehydrated Mushrooms & crisp Garlic Pieces, season to taste
  • Sprinkle on the grated fresh Parmesan Cheese, about 1-1 1/2 cups

Bake for one hour at 350 degrees 
Garnish with chopped cooked bacon & veggies....I used Peas!

 Serving Dinner with Ease & Style...

Continue Reading ...

Friday, January 24, 2014

Pack'n Up Christmas...

For years, before storing Christmas items, I covered my Christmas trees with a plastic paint drop cloth & an old sheet. This year I decided to shrink wrap the Trees...
This idea worked great! I left some of the larger ornaments, decorations and garland on the tree. I packed anything that was delicate or glass. I figured that next year, I could change or add as I set up & decorate. Here is what I used & how:

  •  Plastic paint drop cloth; Cover the trees and tape in place. This will protect your items left on the tree. *Items won't stick to the plastic like they will with the shrink wrap. The plastic drop will preserve your items in mint condition.
  • Shrink Wrap; Wrap the tree from top to bottom. I actually started in the middle of the tree and worked up and over the top of the tree. Then I wrapped back down the tree, continuing down to the bottom. Cut wrap if needed, where you need. What is awesome about the shrink wrap, is you can stretch it to tighten the wrap & secure without using additional tape. It sticks well to itself. I also went under the tree to in close the bottom boughs.
  • Scissors & tape, use as needed
  • Cover the tree with the wrap by overlapping the layers. This will make a stronger cover.
  • Next year, simply cut the shrink wrap off and throw away. Straighten & rearrange your tree as  desired.
Just a note: Our trees were easier to move out the front door to the garage, due to the shrink wrap. The tree was tightly contained within the wrap. It was smaller in circumference, allowing it to fix through the front door with ease.  A Big Plus...My trees are 8 & 9 feet tall, one skinny, one fat!

Next year I can leave the same garland on the tree or change to a new look. In any case, I would rather redecorate next year than totally " un" decorate now!  
Simply Pack'n Up Christmas with Style...


Continue Reading ...

Tuesday, January 21, 2014

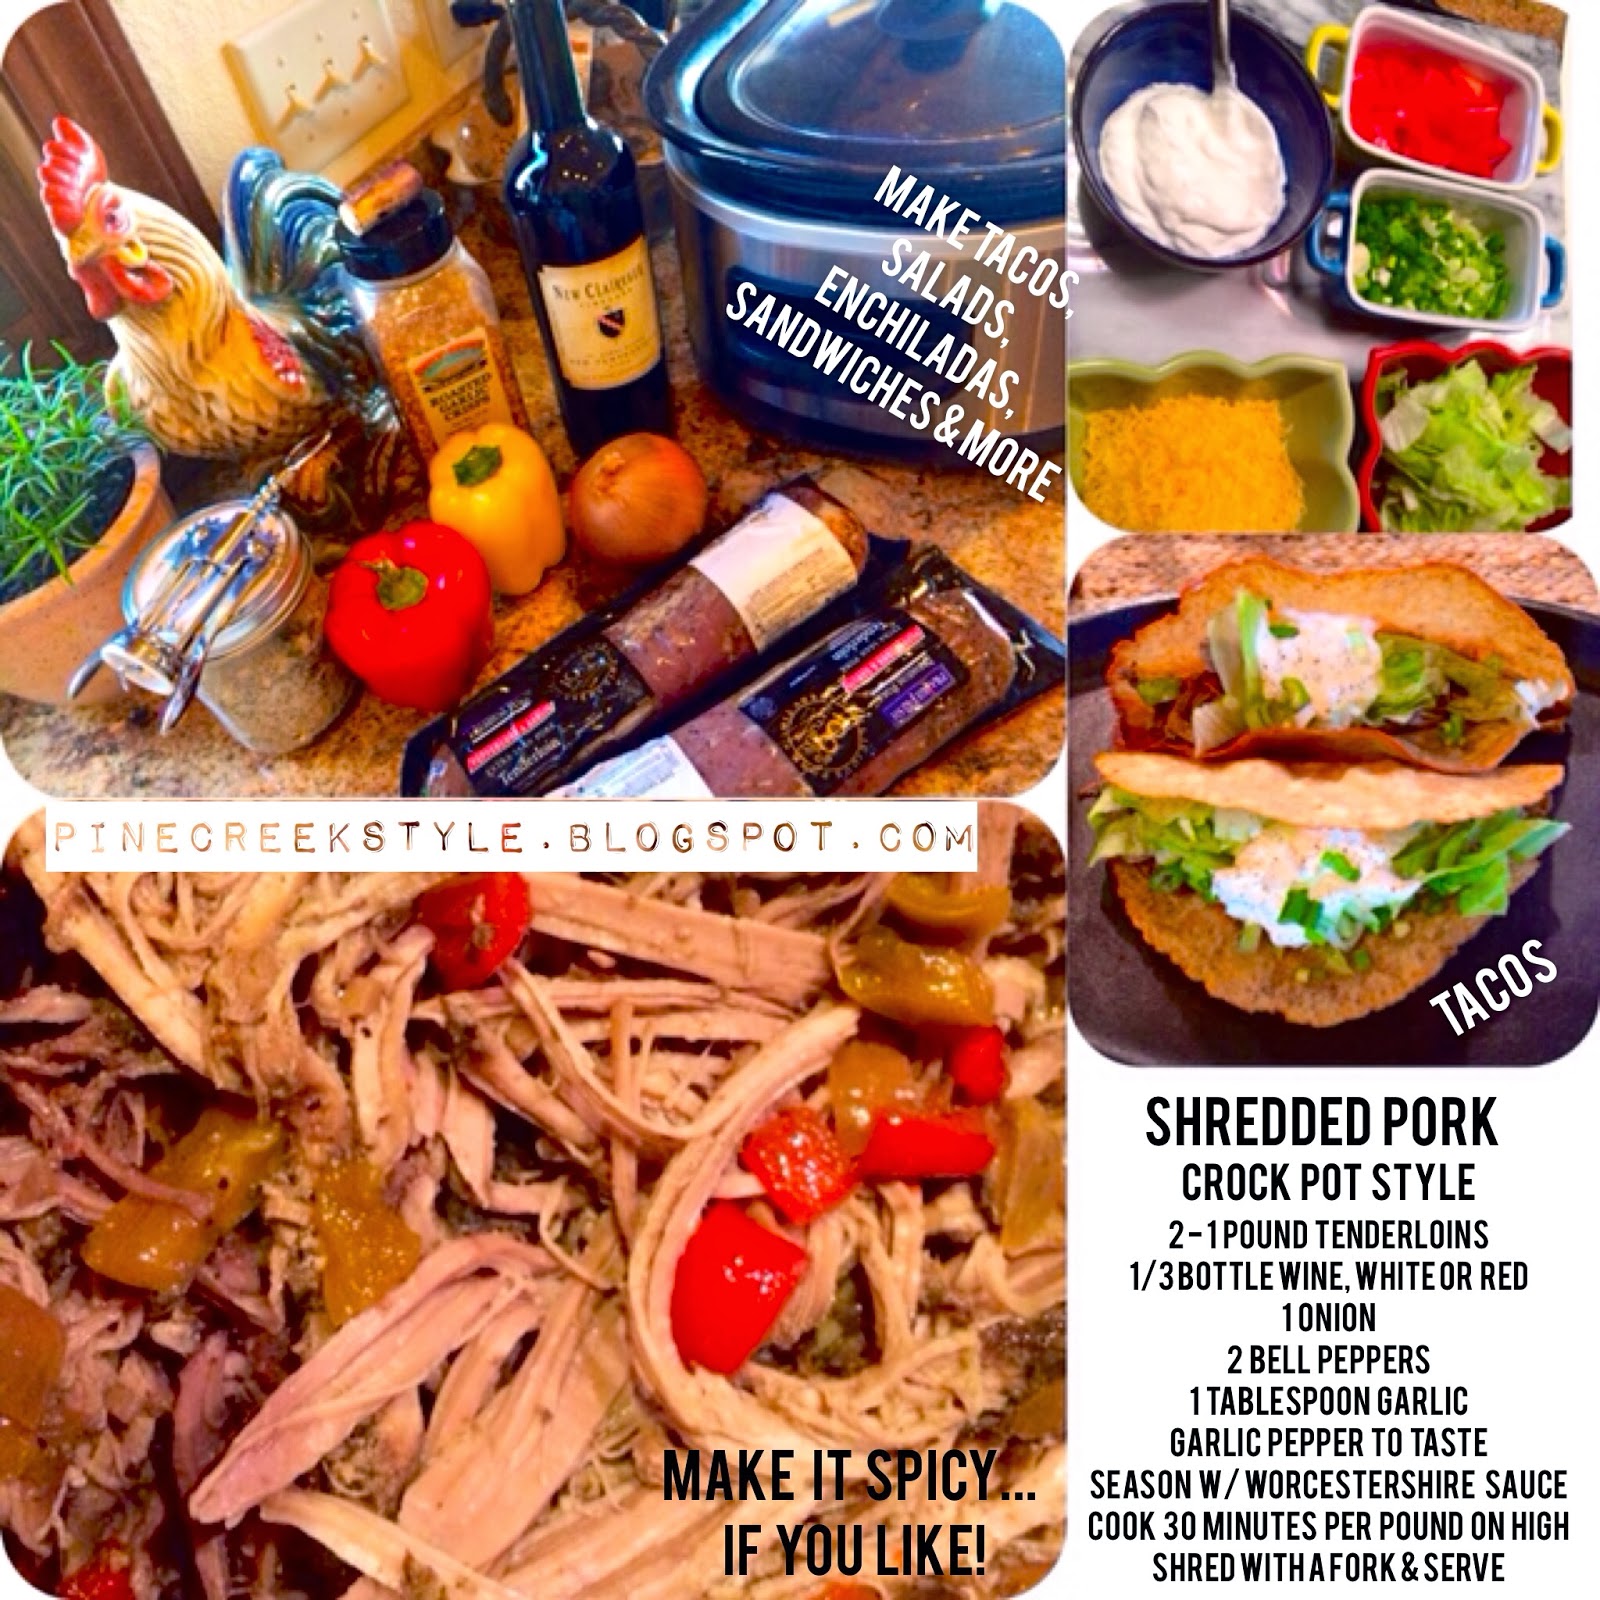
Shredded Pork

Shredded Pork...Oh the meals you could make!
Meat fixed this way is so versatile ... It gives you so many choices for meal planning.

 Shredded Pork - Crock Pot Style

  • 2 i pound pork tenderloins
  • 1/3 bottle of wine, white or red
  • 1 onion, chopped
  • 2 bell pepper, chopped
  • 1 tablespoon minced garlic
  • Garlic Pepper
  • Season w/ Worcestershire Sauce, to taste, optional
*If you want spicy add chili pepper to taste

Cook in a crock pot until done, on high, 30 minutes per pound. Shred with a fork & serve.
Meal suggestions; Tacos, burritos, enchiladas, salads, sandwiches, taquitos... & more
                     Cook in a crock pot on high at 30 minutes per pound. shred with a fork & serve
Enjoy with Style, 

Continue Reading ...

Friday, January 17, 2014

Death by Chocolate & Tequila Cake...

"Death by Chocolate & Tequila" Cake
formally known as Chocolate Mocha Tequila Cake
This cake is so moist.  It is one of my most requested cakes. The flavor is unbelievable. There is a total of over 1,000 views of this recipe, along with countless requests just on my blog alone.
"Death by Chocolate & Tequila" Cake
Chocolate Mocha Tequila Cake with Tequila Icing from Pine Creek Style
 
Ingredients:
  • 1 box of Triple Chocolate Cake Mix, gather all items needed to make the cake according to the package directions, eggs, oil, etc.  * Instead of the water/liquid called for on the box see below:
  • If your Box calls for 1 cup of water, replace the same amount with 2/3 cup cold coffee & 1/3 cup of Tequila Coffee Liquor. *If your cake mix includes a chocolate pouch to use as a filling to be mixed with water...then use equally divided amounts of cold coffee & Tequila Coffee Liquor to mix with the chocolate pouch. Use as directed.
Mix together all ingredients call for on the box; cake mix, eggs, oil, the cold coffee & liquor. Blend well, place in a prepared bundt pan bake according to the directions. Mine called for the standard 350 degrees, judge the time according to the pan you use. When the cake is done, let set for 15-20 minutes before turning out onto your desired cake plate.

Tequila Icing

My cake mix had a chocolate glaze pouch included for the topping/icing. If your does not, there are chocolate glazes in the baking isle near the canned frosting. Place this glaze on the cooled cake first, then add the homemade Tequila Icing for the next layer.
  • 1 cube of soften Butter
  • 4 ounces of softened  Cream Cheese
  • 1 cup of Powdered Sugar
  • 2 tablespoons of Tequila Coffee Liquor
Cream the ingredients together then pipe or drizzle on top the glazed cake

Finishing touches: Grate a chocolate bar over the top of icing is desired. You may use, white, milk or dark chocolate or a combination of all. On the photo above I also used melting chocolate & made  candy swirls. Let harden and use as a finish for your frosted top.

* If your cake does not come with a glaze...I make a chocolate ganache/frosting

Ganache:

  • 1/2 to 1/4 cup of melting chocolate in a small sauce pan
  • Slowly add 1/2 cup of whipping cream to the chocolate, over medium to low heat. Stir constantly
  • 1 teaspoon of coffee liquor tequila, optional
  • Stir continuously until melded together and has a shiny texture
  • Cool slightly and pour over the top of the cake
  • *I layer the candy swirls on top of the ganache after it has cooled completely, see photo above


A semi-homemade recipe from Pine Creek Style @2011

Have your Cake & Eat it Too with Style...
Continue Reading ...

Thursday, January 16, 2014

Window Washing...Outdoors


Washing Windows Made Easy?
A chore we certainly dread....I posted this post 3 years ago when I first started my Blog!
Never in a million years did I think "this post" would ever take off like it did! 
To this date we have had OVER Eleven Thousand viewings!!!
Amazing! Thanks everyone! Here it is again for a re-run.... 
Washing windows on the outside is a big job. But, I found and easy solution over 30 years ago that works! It has made this chore a lot simpler.  Secret weapon, "Woolite"! What you need; a bucket of water, a soft brush on a long pole, a bottle of *Woolite (*I use original or concentrate) and a hose.
Step one: Pour a cap full of *Woolite in a bucket of water 
Step two: Hose off the window with water
Step three: Using the soft brush, dip in bucket and gently wash window
Step four: Hose off the window with water, again
Step five: You're DONE! Let air dry, for a spot free finish!!!
The *Woolite works great on bugs and gunk. The soap causes a sheeting action, so after rinsing with water, there is no need for drying or using a squeegee. 
UPDATE: "We have had OVER 11 thousand views on this post!!!"@ NeeCee2014
See How we Wash our Vehicles...
Crystal Clear with Style...


Continue Reading ...

Sunday, January 12, 2014

Our New Look is Coming Soon...

Our New Look is about to revealed....

Recently, We engaged a Web Designer to help us refresh our Blog. Below is the design Brooke at Uplifted Design presented to us.  Hubby & I approved the look right away! We loved that she listened to our wants & needs. We really wanted to appeal to both Men & Women. We were pretty happy with the new design and hope you are too! We would love to hear your comments....
          Awesome news: Recipes will now have a print option...
Read more below...

Along with the New Design are the new Labels...Each Label has a description about that section and what you will find there.  The "About Us" section has already been refurbished and you will learn more "About Us" than maybe you want to know! Ha ha! And... How Hubby got his moniker... "Ornery"! His preferred nickname...

"Home" of course will take you to the current Home Page.

"The Recipes" will explain our style of cooking and why... As you know we do a lot of Semi-Homemade for the convenience of a busy life style. there are a few recipes that will be more detailed. And of course, we will share our Branding, Ranch & Celebrations too!

"Cooking & Household Charts" will be the place to go for Measurement Charts, Cooking Terms, Baking times, Kitchen List of Essentials & such....

"The Opinionated Palate" is a positive side of our Opinions...Whatever it might be....It's also a place to post any Foodie Faux Pas! And YES, They DO happen! You never know WHAT we may post here!

"The Table & Such" will cover anything & everything between TableScapes and Parties of any kind!

"The Ranch Life" is just that, Life on the Ranch. Lots of photos, a few posts & recipes about  Ranch Life in general.

And of course the "Terms/Disclosure & Contact" Labels are still the same.

The Face Book Page will basically stay the same...so you will want to check there often. You will find, food, crafts, furniture redo, opinions & remarks from me...NeeCee! You never know when I will pop in over there to add something NEW! And, yes the posts from the Blog will post there also....

Keep in mind we will be busy converting all of our posts in order to work with the new program. It will take some time, unfortunately there is no easy way to make the switch over. So I ask for your patience. If you need a recipe and you can't find it, please message or email me and I will send it to you. Thank you in advance for understanding.

PLEASE remember... Show your STYLE and TELL all your friends about Pine Creek Style....and don't forget to SHARE my recipes & posts....I would LOVE to BOOST my Readership of Friends!

My Readers have Style...
NeeCee Signature
Continue Reading ...

Friday, January 10, 2014

Lemon Vodka Crumb Cake...

A Foodie Faux Pas for sure....I was baking desserts for New Year's Eve. Everything was going perfect, the kitchen aroma was heavenly. The cakes were looking awesome! My Vodka Lemon Cake had been requested for the evening by my sister-in-law. So the timer went off...I pulled out the Lemon cake and was surprised to see it had shrunk in height! Hmmm, I let it cool! My little voice in my head was screaming...."It doesn't look right!" Fast forward...YEP! Stuck to the pan!!!! Oh MY,what Do I DO?
Sooo, in talking to myself...I am Telling ME to not panic! I didn't have time to re-bake the cake!

Solution found! The CAKE was a hit! Everyone LOVED it!...Lesson Learned....Use a product you KNOW!
Next time....buy the NAME brand, experiment when you are NOT sharing a recipe with the WORLD! Heehee..... When you are given Lemons, Make Lemonade! See how I went from 0-to-60 and did a quick fix below......
Lemon Vodka Crumb Cake

  • 1 Lemon cake mix;, make as directed except replace half the liquid, milk or water with Citrus Flavored Vodka
  • After mixing the vodka, eggs, oil or butter, etc. mix well and bake according to directions in a prepared baking dish at the required temperature & time. (My recipe called for two eggs, 1/2 cup of butter, milk; I used whipping cream.)
  • When done, let rest for 15-20 minutes before turning out
  • Since the bottom of the (my) pan stuck...I improvised and came up with a new plan. You can easily improvise any recipe to adapt, stuck or not! My cake was not burnt, just stuck! I don't know why???
  • Place the loose pieces back onto the top of the cake. Drizzle 2 tablespoons of flavored Citrus Vodka over the top of the cake. ( If cake is in one piece, just drizzle! Heehee)
  • Spread a layer of Lemon Curd over the top of the cake, like you would frosting. But only on the top of the cake.  *(I had placed my cake in a shallow casserole dish to help hold the pieces together.)
  • Blend together some powder sugar & a small amount of Citrus Vodka to create a thick sugar glaze. Drizzle the glaze over the top of the cake. Let stand for at least an hour to let the glaze set.
Serve the cake either by slicing like a cake or with a spoon/ice cream scoop & a dollop of Brown Sugar Cool Whip on top. *(Brown Sugar Cool whip is just that, blend in a small amount of brown sugar into the cool whip to flavor). This cake (even though it stuck to the pan) was full of flavor and was the talk of the evening! Hands down, everyone agreed this cake was amazing. The cake was moist and packed full of flavor! Two weeks later, I'm still getting compliments on the Lemon Cake. Haha and no one knew I had had a foodie faux pas with the cake...until now anyway! Heehee

Making Lemons into Lemonade with Style,
Continue Reading ...

Wednesday, January 8, 2014

Sausage & Pasta Alfredo

This pasta dish was excellent, full of flavor! Very little seasoning is need because of the ingredients! And a little twist of the Pasta gives you a unique dish. A quick & easy, semi homemade recipe for a busy or a "just plain tired" evening.

Sausage Pasta Alfredo

*1 package of your favorite fully cooked Sausage, *(I used Garlic Swiss Sausage), slice into small thin slices, but NOT too thin.

*Corkscrew Pasta, *(I used low carb noodles to fit my diet), take one piece of uncooked corkscrew pasta and place through the middle of the sliced sausage, (see photos)

*1 jar of Marinated Artichoke Hearts, drained, remove leaves and cut the hearts smaller if necessary

*1 1/2 cups of Italian Cheese ( I used a blend), grated

*1 small onion chopped and sauteed in 1 tablespoon of butter

*2 cups of water, bring to a boil

*1 Beef Broth cube

*1 jar of Alfredo Sauce

*Garlic pepper seasoning to taste. Remember **Easy on the seasoning, the sausage and marinated artichokes render an abundance of flavors on their own.

Instructions:

Bring the water to a boil along with the broth cube

Add the sausage/pasta combo to the boiling broth, cook until pasta done

While the sausage/pasta is cooking, saute the chopped onions in 1 tablespoon of butter, stir well


Add the Artichoke hearts and the Alfredo sauce


Next, fold in the grated cheese, stir until melted and blended

**If you add seasoning, remember less is more with this recipe.

Serve as a Main Meal


This dish was very tasty and fit well with our current diet. And of course, you don't have to use low carb pasta. This easy & quick dinner comes together fast.

Enjoy with Style,


Continue Reading ...

Sunday, January 5, 2014

A Mixed Up Crazy Party...

This could be a very fun & silly party...Ohhh the possibilities! 
A lot of Grammar Schools celebrate something like..."Crazy Mixed Up Days"! The kids wear mismatched clothes,  silly hair or pajama's to school! So why not take it one more step, coordinate  something fun at home & celebrate at the same time!!!
It's a great way to use your leftover holiday & birthday paper plates, napkins, cups , cupcakes sleeves, etc., from every past occasion! 
So, while I was organizing my kitchen...I had a "bright idea"! An after thought really!
Some of the Grandkids had just celebrated Mixed-up Crazy Day at School. I was cleaning out the cupboard where I store all my leftover holiday & birthday plates, napkins, etc.
"Why not organize, divide & bag up a bundle of this stuff and spread the wealth? I had enough products to create 6 or 7 Mixed up Crazy Party bags!
I laid everything out on the dining room table according to each holiday.
Then I started dividing everything into piles. Stacking plates, napkins & more into mixed-up piles !
 This pile had Halloween, Valentines Day, Christmas, New Years, St. Patty's Day & Fourth of July all rolled into one!
Everything was divided & organized.
 I used some gift bags, ribbons & tissue paper I had on hand. And, bagged everything up!
Then I delivered them to the kids and my friends with kids or grandkids!
Everyone who received them...LOVED the idea!
Here is the note I slipped inside...


Make Life Fun & a Little CRAZY with Style...
NeeCee Signature
Ps....Happy 13th Birthday...CocoBean!
Continue Reading ...

Thursday, January 2, 2014

Cheesy Cauliflower & Ham...

Cheesy Cauliflower & Ham for dinner....
"Better than the Best Mac 'n Cheese you've ever had!"
"The aroma from this meal cooking was amazing. We could hardly wait to taste it"! 
 
The Holidays are past and we want to get back into our healthier way of eating. More veggies, fruits, lower carbs, low sugars and most of all portion control! We had taken off quite a bit of weight this past year and are excited to get back on track! ...Haven't met our goals yet!
Sooo...this was dinner last night! WOW...what a way to start! This was delicious! 
A perfect replacement for Potatoes or Pasta as a side dish or as a main meal!
"We served ours as a main meal with a side salad"! 
So Amazing....I'm ready for MORE!
The only problem is...There is only ONE serving left for Lunch!
  Mmmm...
Now, how can I finagle this dilemma?
Serving Veggies with Taste & Style...
NeeCee Signature


Continue Reading ...