
My laundry room was TOO small. I needed a simple solution.

This is the laundry room. See the door on the right? The laundry is as long as the washer and dryer, and wide as the doors. I needed a place for my ironing board, sewing machine and vacuum cleaner.

This is a small guest bedroom. Just enough room for a queen bed and only in front of the large window. I needed a laundry room!
If I could move the bedroom downstairs, into the den/office, it would have it's own bathroom. That would serve as a "much needed" room for Mom D. or an overflow guest room. The room is bigger and has a great location downstairs.
*(What happens with the den/office and it's furniture?
That's another blog post, coming soon!)
Then...
I could use the small bedroom for the new laundry room! The big window would be great, lending plenty of light and a view of the backyard.
Yeah,... solution found!
I could use the small bedroom for the new laundry room! The big window would be great, lending plenty of light and a view of the backyard.
Yeah,... solution found!

Look closely...several colors grace this wall! Oh MY!
Simple solution! Win-win! RIGHT?... NO!
Ran into a problem! Not a big one, but frustrating! I had the original pant cans. Thought... I would simply match and touch up paint here and there! Not so lucky! The paint was too old and looked a different color once it dried on the wall. AND... oops, it was semi-gloss...not flat! So I went to the store. I found a dealer for the same brand of paint. Took the old can with me and asked for the same color in flat! Easy-peasy...RIGHT? NO!
Wrong color, NOT even close! Looked yellow! To make a long story shorter...I did this 5 times, trying to match the paint!
*(Me, Just a wee little stubborn...)
So I gave in!
New plan...

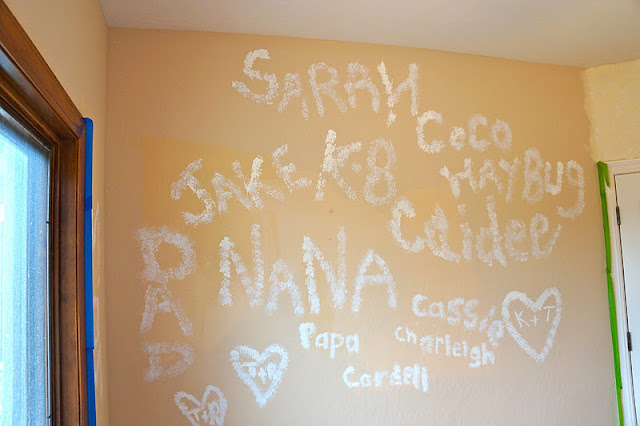
 They loved that I let them put graffiti on the walls! I gave them small pieces of sea sponge to dab the families names on the wall.
*You can see the different colors of beige paint on the wall.
 Step one with Cotton White paint.
 Step two, damp sponge, no extra paint. Work in small sections.


 The third step with the second color went quickly. I used the 'new' paint which was suppose to be the same as the original color. It had a yellowish color to the beige instead of the taupe/beige. This gave the walls a 3-D color effect.
It gave me the Old World look I wanted...

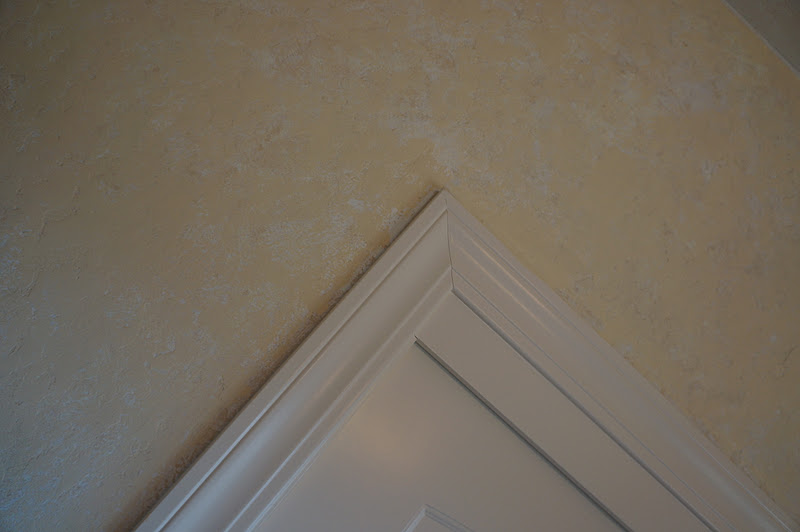
 And, here is a corner of the almost finished room...

Wrong color, NOT even close! Looked yellow! To make a long story shorter...I did this 5 times, trying to match the paint!
*(Me, Just a wee little stubborn...)
So I gave in!
New plan...

I took some paint I had on hand, called 'Cotton White' and the new paint, Pearl Harbor Beige', (that was suppose to match). Pulled out my old my sea sponges! I decided on an 'Old World' look for the walls, to go with my Tuscany style home.
First...I let the grand-kids have some fun!

*You can see the different colors of beige paint on the wall.

I started first with the Cotton White paint. I made random spots with the sponge. Then I went back, filled in and over lapped with the same sponge. BUT...I didn't add more paint in this second step. I just used the damp (w/paint) sponge. Tapping and twisting the sponge. The twist motion would lend a different textured look, blending the first and second steps. You could still see some of the graffiti (from the kids), but that would blend on the third step!


The look after steps one and two. You will have different shades of white blended together over the original color. The original color was called 'Pearl Harbor' Beige. *For the corners; I took a small piece of sponge, damped with paint. In a sliding motion, I covered the corners. This was done with the white paint, using a light hand and very little paint on the sponge. Kind of a white wash look.

This is the ceiling. I wanted a soft cloud-like presence on the ceiling. A perfect way to blend the ceiling, corners and walls. This is a close up view. It is a very faint effect overall. I used the cotton white paint, but only DAMP with paint. And applied by a light tap and swirl/twist motion. The original ceiling paint was lighter than the walls, a "white beige" color. The ceiling is still lighter than the walls yet it blends will with the textured style walls.
It gave me the Old World look I wanted...

Below is a sneak peek of the new laundry room in progress....


The new laundry room will be completed soon...
Can't wait to share it with you.
Got paint? Do it with Style...

"Have a Happy & Safe Halloween"

4 comments :
Wow, this is going to be such a great work space...can't wait to see it completed. And I appreciate you explaning your painting process. I want to do something similiar eventually in my living room and wasn't sure how to accomplish it. Now I do :-)
Thank you....I really love how it turned out! Glad now I couldn't match THE paint! The look was perfect. I did something like this several years ago in my (another home) great room, our bar area connecting the kitchen stood out too much. Basically did the same thing, only I used different colors of white...the result; subtle yet defining without taking over the room! This would be great in a living room, I'm thinking....family room! Have a great day...keep watching for the finished laundry room! :) NeeCee
Soft cloud presence achieved! Love the "grafitti" hehe!
The graffiti was FUN! And, the Kids now have a secret hidden message under the paint! The soft cloud effect did turn out well! So HAPPY with the results....check back for the final results coming soon.....Have a great week, NeeCee
Post a Comment