-
Showing posts with label Fruits. Show all posts

Saturday, August 8, 2015

A Perfect Pear-ing...A Summer Dessert

Simplistic & Refreshing....Ready in minutes....The presentation is beautiful....Make ahead, Serve later...The perfect finish to a fabulous meal.

The Perfect Pear-ing...A summer Dessert
    Author: The CattleQueen Cooks

Ingredients:

  • 4 pears, washed, cut in half, & cored
  • 3/4 cup of Ricotta Cheese
  • 1 heaping tablespoon of Brown Sugar, plus a scant amount for garnish
  • 1 heaping teaspoon of Apricot Jam  *(I used sugar free), plus about another couple of teaspoons or so for garnish
  • 1/4-1/2 cup of ground pistashio nuts, plus eight whole pieces for garnish


Driections:

  1. Set aside the prepared pears
  2. In a medium bowl, mix together the ricotta cheese, brown sugar, apricot jam and half of the nuts 
  3. Mix well, reserve the remaing ingredients for garnishments
  4. *Reserve a small amount of the cheese mixture for garnish, about a teaspoon or so for each pear half


Assembly:

  • Per Dessert: In a serving dish place two dollops of the cheese mixture
  • Place 1/2 of the pear on each dollop
  • Inside the small cored area of the Pear, place a small amount of the reserved cheese mixture.
  • Next place a small amount of apricot jam on top of core filled area
  • Garnish with a whole pistachio nut
  • Sprinkle remaining ground nuts over the dessert and repeat with the remaining amount of the brown sugar
  • Repeat the process for each "Pear-ing" Dessert
Serve immediately or Make ahead & serve chilled...Very refreshing & light!
 photo photo-12_zpsb1f5b574.jpg
Continue Reading ...

Monday, June 30, 2014

Cherry Vodka Bombs...

Oh WOW...these were the Bomb! Amazing little gems...BUT, be careful...they pack a wallop!
 These are so simple...But,  there is some patience involved....You "gotta" soak the cherries for 5-7 days in the Vodka! See the recipe below...*(2-3 days works also...but the flavor won't be as strong)

Cherry Vodka Bombs
  recipe by NeeCee @ PineCreekStyle


  • 1 batch of Cherries, pitted & presoaked/infused with Vodka (see that recipe here)
  • 2 cups of  melting chocolate candy for diping
  • wax paper
  • This is a recipe for the 21 & Over Club!
Directions:

  1. Drain the Cherries from the Vodka, set on a paper towel to soak up excess moisture
  2. Melt candy chocolate according to the directions on the package
  3. Working quickly, Dip the drunk'n cherries, one at a time,  in the melted chocolate and place on wax paper or parchment to harden. Repeat
  4. *** If you choose to leave the stems on a few, pit from the bottom leaving the top intact or dip fresh cherries, non alcohol, in the chocolate. **If you do NOT pit the Cherries be sure your guests are aware of the PITS!
  5. Store in the refrigerator when not serving.
A Note from NeeCee:
The Cherry Vodka Bombs are very potent...You may want to limit your consumption. This recipe is for the 21 & Over crowd.


  • Serve with special cocktails or as a dessert treat! 
  • These may also be served in drinks without the chocolate. 
  • Frozen without Chocolate served in Drinks will keep your Cocktails cold, giving you a chance to savor the infused cherry when the drink is finished!

Serving a Sweet Treat Packed with Flavor & Style...
 photo photo-12_zpsb1f5b574.jpg
Continue Reading ...

Thursday, April 10, 2014

Best Ever Peach Cobbler...

Best Ever Peach Cobbler....YES...It's that Good! Why??? It's the Secret Syrup!!!
Please read all of the instructions completely. There are a few steps to preparing the recipe. 

Best Ever Peach Cobbler Recipe:

Turn on Oven to 400 degrees

A 4 Step prep Recipe ....

1. Secret Syrup Sauce:

  • 1 Cup of peach juice or water *(I save & freeze juices from canned fruit for use later)
  • 1/3 cup of brown sugar *(I used Splenda Brown Sugar)
  • 1-2 tablespoons of Lemon Juice
  • 1 jar of Peach jam, 10 ounces regular or sugar free
  • 1/4 cup sugar
  • 1/4 teaspoon of cinnamon
  • 1/4 teaspoon of nutmeg
  • 1 tablespoon of butter
  • 2 tablespoons of corn starch
**NeeCee note: Since I used sugar free items in a lot of my own cooking....I did the same in this one....The results were amazing!

 Prepare the Peach Syrup first.  Cook on medium to medium high heat to thicken. Use a whisk whip to blend the sauce, stirring constantly. When thick, turn off the stove and let set while preparing the Peaches, stirring once in a while....

2. Prepare Peaches:In a 9 x 13 deep dish prepared pan...Place 2-3 bags of frozen peaches ( leave peaches frozen) Then....Pour the Syrup over the top of the peaches...Place in the heated Oven while you prepare the biscuit mixture.

3. Biscuit Batter Recipe:

  • 2 1/4 cups of Bisquick
  • 1/2 teaspoon of salt
  • 4 teaspoons of sugar
  • 1/4 cup of softened butter, not melted
  • 2/3 cup of Butter milk ( A prepared buttermilk powder works well too!)
  • a dash of cinnamon & nutmeg, *optional 
** Remove the prepared peaches from the oven and add the little biscuits:
 Leave the oven on....

Mix & blend well...roll into tablespoon sized balls...place the small polka-a-dot biscuits on top of the hot peaches.

Return to the heated oven at 400 degrees bake another 10-12 minutes or until the biscuits are golden on top...

Last Step:

4. Homemade Whipping Cream (optional)

  • 2 cups of Whipping Cream
  • 4 tablespoons of Sugar 
In a chilled metal bowl place the ingredients. Whip with an electric mixer, (I chilled my whip attachments in the freeze first).

Whip until it thickens....Do not over whip or you will have sweet butter. Place in the refrigerator until ready to serve.

***After the Cobbler had finished cooking, I glazed the biscuits with Butter and dusted the top with cinnamon sugar...It really added a nice finishing touch to the crust! It reminded me of Snickerdoodles! Yummo!

*Cobbler may be reheated to warm on a low setting 

Serve with Love....
 Secret Syrup Sauce above...Smells like heaven!
On a recent weekend, some dear friends from high school days...gathered to share a
Holiday-Style-Dinner...Just because we could! The photo above is our amazing Turkey Dinner with all the fixings, appetizers, cocktails, wine & beer, and of course Peach Cobbler! Thank you LeeAnn & Dave for Hosting & the main meal....Quentin & Sue, Ornery & I enjoyed everything immensely ! Doesn't get better than that....Haha...We visited for over 7 hours and it felt like minutes!

Don't forget to Love, Like & Share on all of our venues....Facebook, Pinterest & Instagram
Serving Life & Dinner Up with Style...
 photo photo-12_zpsb1f5b574.jpg
Continue Reading ...

Friday, May 25, 2012

Pineapple Boat...

This will float your boat...
 Pineapple Boat that is...
Below we will show you how to cut and present an awesome looking Pineapple Boat. It's a fun way to impress your family & friends with your special carving and presentation skills. My husband learned how to make Pineapple boats while in Hawaii several years ago. I have never carved one!
He does it all and does it well! So I leave it to him.
 My husband says he picks his pineapples by the uniformity of the pineapple eyes. A little side note: Pineapples DO NOT ripen past the point of being picked.
That being said...Let's make a boat!
Twist off the top of the Pineapple 
 In a quick and firm manner
Wa-Lah...A clean top!
Cut the pineapple in half, lengthwise
 Oh yummy....my mouth is watering now!
Then cut each half into halves again. Rendering 4 pieces. Remove the cores from each piece. *Discard the cores or use as swizzle sticks for drinks.  
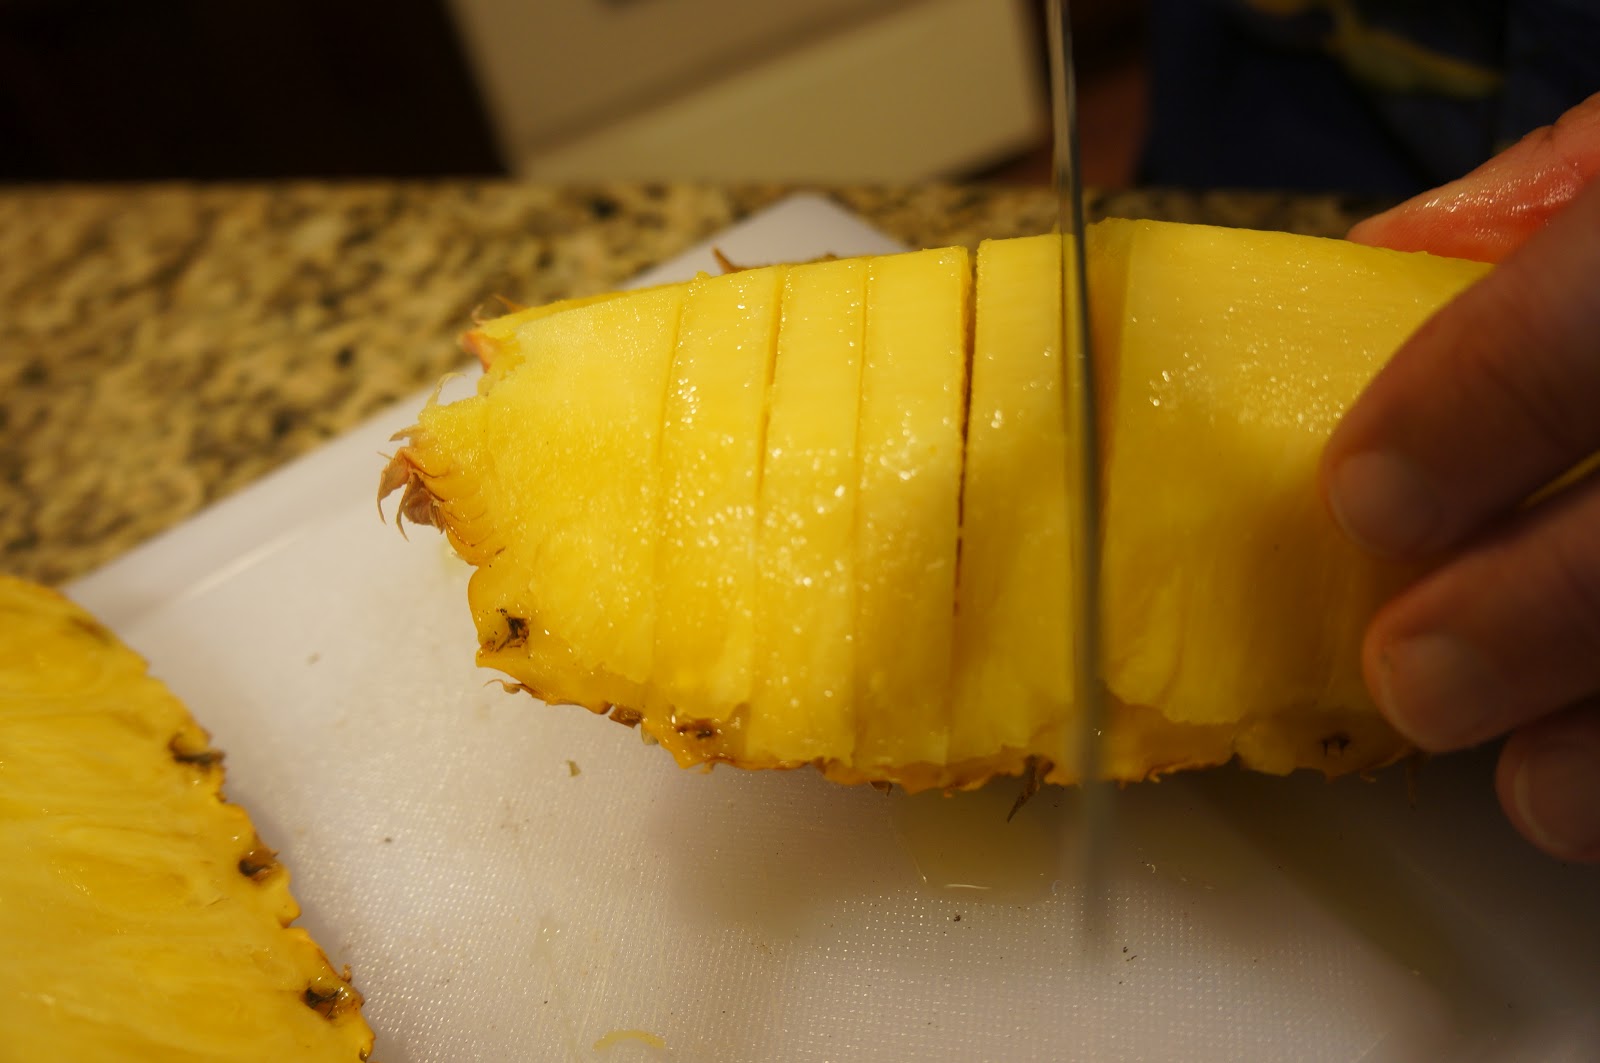
 Next, slice the pineapple along the inside of the outer skin. Leave the fruit sitting on the shell of the skin.
 Cut the pineapple in equal slices, across lengthwise. Leave fruit in the shell, these serve as your boat base.
 Turn the pineapple lengthwise and alternately slide the fruit pieces in opposite  directions.
 TaDa!!! Pineapple Boat!!! 
Repeat the same steps on the rest of the quartered pineapple pieces.
These make a lovely center piece.  Let ME tell you it was NOT easy taking photos, smelling the ripe pineapple and WAITING to sneak a BITE!
Showcase your Pineapple with Style...
NeeCee Signature
This is our oldest Granddaughter when she was a baby!
Tomorrow night she will graduate from High School! Where did those years go?
Dear Baby "K"...We LOVE you Soooo much }...
Congratulations on Your Graduation and a job well done!
We love you in the WHOLE WIDE WORLD, the Ranch & Everywhere...Disneyland too!
xoxo'S, Nana & PAPA
Continue Reading ...

Monday, April 23, 2012

Drunk'n Apples

Drunk'n Apples  for Dessert
While Hubby and I were on R&R, we made these stuffed apples for our Easter Dessert.
 1 package of Granola...(I used tropical blend), about 3/4 of a cup
2 apples (Hubby picked a red, I picked a green), cored, left whole
1/4 cup of whiskey
2 tablespoons of brewed coffee
2 tablespoons of maple syrup, *I used sugar free
1/2 cup of pecans
1/4 cup of brown sugar
*dollop of cool whip, optional
Preheat the oven to 375-400 
 Core the center of the apple, remove and discard the core & seeds.
Make an opening wide enough to stuff with the granola mixture.
Slice and level the bottom of the apple so it will sit still and not topple.
 Mix together all of the above ingredients, reserving the apples and the cool whip. After the granola mixture has been mixed and blended, stuff the center of the apples.
* I overstuffed the apples as you can see in the photos.
 Bake in the oven for 1 hour. Yummy for the Tummy!
 Top with Cool Whip, garnish with a pecan....AND serve!!! 
This recipe may easily serve four people when the baked apple is cut in half.
Oh MY, This was delicious!
A Simple Dessert with Style...
NeeCee Signature
Continue Reading ...

Tuesday, April 3, 2012

Quick & Easy Easter Breakfast...

Easter Morning Breakfast Buffet
Feed the Family the easy way Easter Morning, make an Easter Breakfast Cereal Buffet. Anything that looks like ice cream sundaes will be intriguing. And the Upside is... while they are busy making their breakfast, you can concentrate on the BIG meal of the day.
 Use favorite cereals, cool whip, waffle cones, bowls, fruit, nuts, whip cream, candy sprinkles & more. Make a Smorgasbord of yummy choices.
 I mixed cool whip with 1-2 tablespoons of brown sugar & 1/2 teaspoon of vanilla together. Blend well. Then I added the fruit; banana, strawberries and blackberries. Stirred in some walnuts and mixed well. Then we layered the waffle cone with layers of cereal & fruit mixture. 
We topped it off with canned whip cream and pieces of fruit.
This version was made in the same way but looks like a sundae. 
Mmmm,
drizzle some chocolate or carmel sauce over the top!!!!
Lay the cone in a bowl (for small children this might work well) and add chocolate sprinkles.
This is chocolate cherrio's with fruit, whip cream and candy sprinkles!
Banana split cereal style! 
I featured this last Father's Day for the kids to serve their Dad's.
Slice some pound cake and let them make a fruit shortcake breakfast!
If you have the time have a smoothie station too! 
Or just serve juice, milk, coffee & tea.
Either way, Easter breakfast will be a hit with the crowd.
Serve Easter Breakfast with Ease & Style...
NeeCee Signature
Helpful Hint:
Use Easter paper plates, bowls and cups to save on dishes & time for the Breakfast meal.
All Photo's belong to NeeCee at Pine Creek Style
Continue Reading ...