
Last week while shopping at Michael's I found a simple little metal cross... a project POPPED into My head. So I bought the only two! I knew eventually I would find what I needed to complete my project.
Well, this weekend I ran into TJ Maxx looking for a pillow I (think I) need!
The pillow wasn't there.
BUT, I found the frame I had hoped to find for my project....

First I wanted to share a few of the crosses I have around the house. Then we will get to my projects. I think you are going to love them.
I love all styles of crosses. From ornate to simple, the cross always keeps its simplicity yet represents greatness.

I love this saying...It is SO true. this hangs near the kitchen at the back door.

I have crosses hung at the entrance if each bedroom.


The one above our Son & Rae made for us as a Christmas gift a couple of years ago. A hand made candle, then they add beautiful crystals to the cross.
I keep this and the ones below in my powder room off the living room.


The living room fireplace.

The laundry room.

The master bathroom.

Another candle a Christmas gift this year from Son & family.

This hung in my bedroom while growing up. When I was eight I was quite sick and spent a huge amount of time in bed.
It glowed in the dark and was always a comfort.
It glowed in the dark and was always a comfort.

I made this one and four others like this for my husbands family a couple of years ago. It has a very special meaning for us. It is made of antique barbwire and turquoise. The barb wire collection belonged to my Father-in-law. He had given it to me several years ago. I have a few pieces left.
I think I will make our kids a smaller version for Easter. They will love it!
I think I will make our kids a smaller version for Easter. They will love it!

I recently posted this cross. I made from my Great Grandparents homestead.
So lucky to have this piece of family history.
Time for the project...
3-D Framed Cross w/verse

Found the metal crosses at Michael's. The concho's I bought at the local Bull Sale last month. But you may locate them on line. I used some paper I had on hand for the Bible verse. And a frame I found at TJ Maxx.

The frame is a box frame. The inside is padded material and was intended to use a memo box. I bought it for half price due to some nicks in the wood.

I had some corks I keep on hand for other uses.
I cut them into thirds, making smaller rounds.
I cut them into thirds, making smaller rounds.

I pressed the cut corks with my thumb to even out the cut cork. I used these to give the cross and the bible verse a 3-D effect.

I have several packages of nail files I bought from Michael's a while back. I use these for small projects that need to be slightly sanded. These work great!
*They are also awesome to use on the soles of new shoes to scuff so you don't slip!
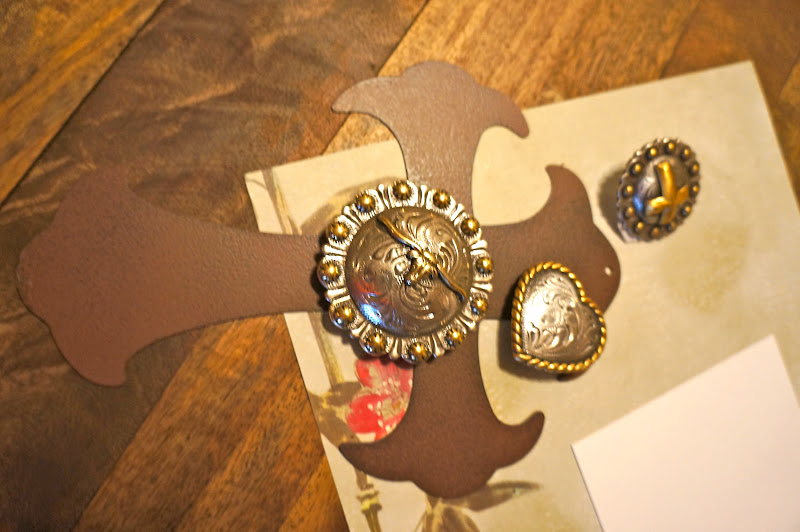
I had several concho's to choose from.

I punched a hole in the center of the cross so I could attach the concho.
It was late and I didn't want to go downstairs to get the drill. This method worked fine but it does take longer.

A little fuzzy but you can see how I attached the concho.

Back to the frame. I just filed a little here and a little there to blend in the chipped marks. Adding an old weathered look.

The cork rounds were glued onto the fabric after they had been measured and marked.

Then I put more glue on top of the cork rounds, and I added the cross.

I used some leftover paper and printed out the Bible verse.
Then I tore the paper around the edges.
Then I tore the paper around the edges.

Perfect! Just the look I was going for...

I used a piece of heavier photo paper for the back to give the paper more strength. You will glue this onto the frame backing. Just as you did with the cross.

I measured and centered the cross to the frame. Leaving enough room at the bottom for the Bible verse.

This is one of my favorite verses. When my 3 types of Arthritis get me down or just HURT, I read this verse to remind me I will get through the rough spots!
I also highlighted this verse for my son in his military issued bible when he travel over seas a few years ago.
I LOVE how this turned out! So happy with the finished project.
Another Framed Cross below...

This went very fast. And it looks great. I used an old frame I had on hand. I removed the glass and will keep it for another project on another day.

I cut a piece of cardboard to fit the frame. This one was 8x10.

Then I cut burlap, slightly larger than the cardboard piece.

I used the hot glue gun to attach the fabric. Be careful of the hot glue...

Place the burlap covered cardboard into the frame. then place the original frame backing onto the frame. Turn over the frame to complete.

Measure and center the cross. Attach in the cross by gluing the back of the cross then placing on the marked burlap. A cute 3-D picture. Many variations could be made with this project. It would make a nice Easter gift too!

The finished project found a home!
Join me on Pinerest today...repin these projects and more!
This project was fun, easy and Stylish...

*All photos belong to NeeCee at Pine Creek Style

No comments :
Post a Comment